How to QA GA4 Ecommerce Tracking in Shopify Checkout Extensibility?
Yikai Wang | 9 August 2024
Last week, we shared a step-by-step guide on implementing GA4 ecommerce dataLayer in Shopify’s Checkout Extensibility. If you or your developers need assistance with GA4 tracking, you can find that article here.
If you have already started the dataLayer migration, you might be wondering: GTM preview doesn’t work in Checkout Extensibility. How do we test if the tracking is functioning correctly?
The answer is not straightforward, this article outlines several approaches to optimize the quality assurance process before you launch GA4 ecommerce tracking setup for Shopify Plus's checkout extensibility.

QA Tags in Checkout Extensibility with the Legacy GTM Tag Assistant
When you click the 'Preview' button in the GTM workspace, you will notice that the GTM Tag Assistant disconnects when you reach the checkout pages powered by Checkout Extensibility. This happens because the current version of GTM Tag Assistant cannot access the custom pixel where the GTM snippet and dataLayer are located.
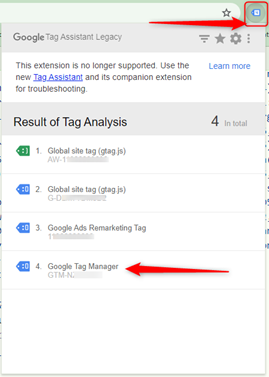
However, the previous version of Chrome GTM Tag Assistant extension, which has been announced for deprecation but still technically functions, can still verify if gtags and GTM are installed on the page and check the dataLayer values passed. Although it doesn't provide details like firing orders and event details as the latest Tag Assistant does, it serves as a useful first QA step to ensure the ecommerce dataLayer values and the GTM installation are correct.
You can install this extension here: https://chromewebstore.google.com/detail/deprecated-tag-assistant/kejbdjndbnbjgmefkgdddjlbokphdefk
Once installed, make sure you enable the extension and add it to the tool bar in the chrome browser. As you review the checkout pages, click on the icon in Chrome browser’s tool bar, and click on ‘Enable’ button. You will see the tagging status in the dropdown widget, click onto the ‘Google Tag Manager’ tab to view the dataLayer and iframe status:


Find the dataLayer object in specific custom pixel in Checkout Extensibility
You can still type ‘dataLayer’ in the browser’s console to review the dataLayer object, but you won’t see the object defined in the custom pixel at the ‘top’ level. To view the dataLayer object, you need to find and select the correct custom pixel file. Here's how you do it:
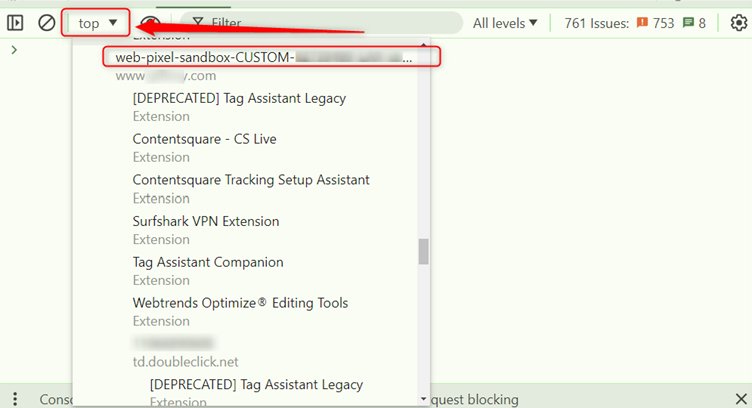
Open the browser's developer tools and go to the 'Console' tab. In the top left, next to the clear console icon, you'll see a dropdown triangle. This allows you to switch between different frames or levels of the site. To access the dataLayer object defined by Shopify's Checkout Extensibility custom pixel, where you install GTM and dataLayer, you need to select the specific frame that contains the custom pixel file, instead of using 'top'. This ensures you are viewing and interacting with the correct objects that are added at different levels of the site.
The custom pixel file name starts with ‘web-pixel-sandbox-CUSTOM-‘, followed by an eight-digit pixel ID. If your site uses multiple custom pixels, you'll find different frames in the browser's dropdown list, each with a unique ID. Select the frame corresponding to the desired pixel. Once selected, you can inspect the dataLayer by typing "dataLayer" into the browser console. Here, you should find the ecommerce dataLayer implemented by your developers for Checkout Extensibility.

You might wonder how to find the custom pixel ID. You can find it using Shopify Pixel Helper in the individual custom pixel settings. The Pixel Helper is also a useful tool to examine the events and values being passed on from Shopify to the custom pixel. The next section explains how you can access this tool.
Use Shopify Pixel Helper to Review Variable Values in Checkout Steps
To access the Shopify Pixel Helper, navigate to your Shopify admin, go to ‘Settings > Custom events’, and then select the Custom pixels tab. Locate the custom pixel you used for GTM snippet and dataLayer code. Next to the pixel name, click ‘Test’ button.

A new browser tab will open automatically, displaying the Pixel Helper interface alongside your website. Within this tool, you can find your custom pixel ID and examine the events and subscribed data associated with the pixel on each page of your site:

Live Test GA4 Tracking for Shopify Checkout Extensibility
GTM preview mode is such an essential part in our GA4 QA process, the fact Shopify Checkout Extensibility does not support it necessitates a rigorous live testing approach. There's no sugarcoating it; if you want to ensure accurate tracking in your checkout with Checkout Extensibility, live testing is non-negotiable.
One approach is to send data to a testing GA4 property before launching your final version. You can create a dataLayer variable to route live data to this testing property, allowing you to refine your tracking setup without affecting your primary data.
For the daring, consider a "baptism by fire" approach. Launch during a low-traffic period and closely monitor your tracking setup within the first hour. Match orders against GA4 data for a few days to ensure accuracy before fully relying on it
Remember, the ideal live testing process is unique to each development team. Experiment, adapt, and find what works best for you.
Successfully implementing GA4 tracking within Shopify's checkout extensibility framework requires careful planning and execution. If you are facing challenges or seeking expert guidance to optimize your conversion tracking, our team at Hookflash is here to help.
Want to have a chat?
Chat through our services with our team today and find out how we can help.


